shirt being hanged dried

How to Properly “Hang Dry” your clothes

The last thing you want when doing laundry is to remove your favourite blouse from the dryer and discover it has shrunk. While we wish there were simple, all-encompassing rules for remembering how to dry clothes, it sometimes just not that easy. To help keep your clothes free of stains, wrinkles, and damage, use our guide to drying clothes the right way.

We all have a least one article of clothing with a care label that says “Hang to Dry.” Most of us have probably thought at one time or another, do I have to? And weighed the risk of throwing that piece in the dryer along with the rest of the laundry.

Well, for all you who want to avoid turning your favourite pieces into doll clothes, here is a guide on why you should hang dry certain garments and how to do it properly so your clothes continue to last and look great.

Why Are you Expected to Hang Dry?

Hanging clothes to dry helps to avoid the heat damage that can be caused by traditional dryers.

Delicate fabrics, such as those used in activewear, underwear, and jeans, can lose their shape and fit due to the harsh tumbling and heat of the dryer. By air drying your clothes on a clothesline or laying them out to dry on a flat surface, you can help your clothes maintain the same fit and form they had when you first bought them.

A good rule of thumb: If your garment is made of synthetics, wool, or lace – double-check the clothing label to see if it’s a hang dry items. 

How To Properly Hang Dry:

As a general rule of thumb, the clothing items you launder in a permanent-press or regular cycle in the washing machine can also be dried in the clothes dryer. But it’s always best to check the clothing care label. You especially don’t want to machine-dry anything that is required to be washed by hand. When in doubt, air-dry garments on a clothes-drying rack. This option saves money on fuel bills, extends the longevity of clothes, and reduces concerns about ruining certain clothing.

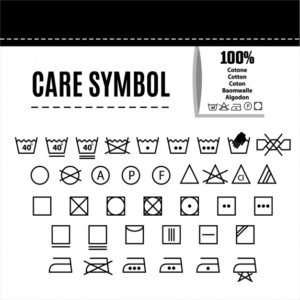
Check the care label and wash your clothes accordingly. The clothing label will direct you on the best method, be it a machine washer or by hand with hot, warm, or cold water. If you’re unsure what those comically unintuitive care symbols mean, you can reference our handy laundry symbol guide.

At Rinse, we always follow the care label on your clothing. It’s just another reason why we’re the most trusted brand in clothing care. Try our Hang Dry service and experience our quality cleaning and exceptional customer service for yourself. 

Hanging your clothes outside on a clothing line? Follow these tips:

  1. Pants: Hang your pants upside down. Make sure to match the inner leg seams of the pants, and then place the clothespins on the hems while attaching it to the clothesline.
  2. Shirts and tops: Also hang these upsides down. Place the clothespins at opposite ends of the bottom hem of the shirt or top, and pin to the clothesline.
  3. Socks: Hang socks in pairs and upside down. Attach the clothespin to the toe area of the sock and let the top part of the sock hang down.
  4. Bed linens: Since sheets and blankets can take up a lot of space on the clothesline, you should fold them in half and pin each end to the clothesline.
  5. Underwear and bras: Hang underwear from opposite sides of the upper seams, and bras from their hook end.

Drying your garments inside? Tips to help them dry quicker and look their best:


dry hanging


  1. Make sure to lay your clothes on a flat surface when air-drying garments inside.
  2. Be sure to leave some room between garments to allow air to circulate between them. (A wet pile of clothes is a wet pile of clothes whether you carefully created that pile or not. The key to successful air-drying is ventilation).
  3. Place your clothes near a window, vent, air-conditioner, or a fan to speed up the drying process.
  4. Don’t have enough space to lay everything flat to dry? No problem – the key is prioritization.
    • Sweaters and other garments made from heavy or stretchy material should always be laid flat to dry.
    • Other types of garments like yoga pants, swimsuits, jeans, etc can be hung inside using hangers or a drying rack.

Hanging your clothes may take more time and effort than the traditional dryer, but it can help some of your favourite garments last a lot longer and stay looking as great as the day you bought them.

How Should I Prep My Clothes for the Dryer?

hang drying images

Before even washing clothes, you need to sort clothing. Separate wash loads by texture (items that produce lint and those that attract it), fabric (put clothing items of similar materials together), soil (separate heavily soiled from lightly soiled), and colour (whites, lights, darks, items that bleed). This pre-wash prep work will make it easier to sort clothes for the dryer. When drying the items, however, it’s especially important to separate clothes by weight. Mixing heavier items with lighter items might mean one comes out overdried and the other still damp.

Give just-washed clothes a glance and a shake before tossing them into the dryer. Make sure the washing machine did its part in removing stains. If stains remain, treat them again to remove the stain completely before drying. If a stained garment goes into the dryer, the stain will likely become permanent. Shake out garments or linens before putting them in the dryer to remove hidden items (such as socks), help items dry faster and reduce wrinkles.

Conclusion

Let someone else take care of the laundry

If you’re overwhelmed by piles of grubby laundry, then why not let someone else deal with it? Our award-winning dry cleaning and laundry service makes wash day a breeze. Upon subscription, We’ll collect your laundry, clean and iron it using professional methods and equipment, and return it to your door. We’ll even fold or hang it for you, so it’s ready to go straight in the wardrobe or drawer.

Your washing machine needs to be cleaned thoroughly every couple of months, and you should be running a hot maintenance cycle at least once every two weeks. This will leave your machine out of action for a few hours, so subscribe to our service and let us handle the hard work while you scrub up.

Images showing clothe label

Understanding Washing symbols and Clothing Labels

Washing symbols and Clothing Labels may appear confusing, but are quite easy to understand.

Each clothing label should tell you what the fabric is made from and include up to five symbols that let you know how to care for it. 

Preserving your clothing tags may be one of the most important things you can do when it comes to caring for your garments. It’s not always as simple as distinguishing between dry or wet wash. 

What do the washing labels on clothes labels mean?

clothes-care-symbols


This group of UK washing symbols helps you decide if your clothing is safe to wash in your washing machine, and which setting, and what temperature you should use.

It is generally depicted as a bucket filled with water (except for the ‘Do not wring’ symbol). If the garment is machine washable, then you’ll either see dots or numbers inside the bucket symbol, representing the recommended maximum temperature: one dot means 30 °C (meaning that you have to wash your clothing in cold water), two dots 40 °C (warm water), and four dots 60 °C. 

In case you see one line drawn underneath the bucket, it means that your piece of clothing should be washed on a synthetic cycle, while two lines represent the gentle or wool wash cycle. If you find the hand wash symbol on your garment’s fabric care label, wash the item by hand at 40 °C or lower, or use your washing machine’s hand wash program.

  • Bleaching symbols on washing symbols and clothing labels

Before you turn to your bottle of bleach to make your whites shine like they used to, it’s worth taking a look at your garment’s fabric care label to see if the clothing can handle bleaching agents.

  •  Drying guidelines on washing symbols and clothing labels

In addition to washing and ironing, the laundry process also includes drying. To prevent your garment from shrinking or becoming misshapen when drying, you can find several helpful symbols on the fabric care label, informing you of the most surefire way to dry your clothes without causing any damage to the fabric.

  • Ironing symbols on washing symbols and clothing labels

Ironing symbols depict an iron with dots inside representing the maximum temperature that you should use to iron the garment.

  • Dry cleaning symbols on washing symbols and clothing labels

Some garments are better off being handled by a professional: that’s when dry cleaning comes into the picture. The below symbols are intended to help you decide if your piece of clothing should be dry cleaned and to tell the dry-cleaner what solvent to use . However, When dealing with your most delicate pieces of clothing, your dry-cleaner appreciates every help they get.

That’s why fabric manufacturers include many dry cleaning symbols on clothing labels, represented by the combination of a circle and a straight line

Different colors, different care for washing symbols and clothing labels

The first rule of laundry is to check the care label, and the second rule is to separate your darks and lights. Most clothing can tolerate warm water, dark or bright fabrics work best with cold water to prevent color transference. The label will state “Do Not Bleach” if the garment can’t withstand bleach products or “Non-Chlorine Bleach When Needed” if only certain types of bleach can be used.

Our Process at Laundryman when handling washing symbols and clothing labels

At Laundryman, we follow these rules for every order. Your clothes are properly sorted and expertly cleaned when in our care. If you don’t want to deal with rules one and two yourself, the third rule of laundry is to have someone else take care of your laundry for you. That’s where laundryman comes in! We’ll pick up, expertly clean, and hand-deliver your laundry straight to your door, 7 days a week.

Wet wash or dry clean only 

Unless a clothing label reads “Dry Clean Only,” the item can most likely be hand washed with an ultra-gentle detergent designed for delicate fabrics.

Special care items such as outerwear, certain textiles such as merino wool, and delicate embellishments or silk fabrics are better left to a trusted dry cleaning service (especially if the label recommends “Professional Dry Clean Only”).

Caring for upscale fabrics |washing symbols and clothing labels

More delicate pieces will often have the following instructions: “Machine Wash, Gentle or Delicate” and “Tumble Dry, Low Heat.” This means setting your machine to the lowest setting for gentle care at a maximum of 86 degrees Fahrenheit (compared with a fabric like cotton that can withstand 200 degrees). Alternatively, if your dryer does not have a low heat setting, opt to hang dry your item instead. For more refined fabrics such as pure silk, consider using professional laundry services.

For best results: Treat your clothes to a gentle cycle, or hand wash, and always use cold water (below 85 degrees Fahrenheit). To hand-wash, simply fill a basin with cold water and add a gentle detergent. Besides investing in a gentle laundry soap for your most treasured pieces, laundry nets are also a fuss-free way to provide an extra layer of protection for washable items.

Conclusion

As a general rule for heat instructions, the more dots on the label, the higher the temperature. But consult the breakdown below for specific temperature limits:

Machine Wash

  • Normal: Water temperature does not have any heat restrictions
  • Cold: Water temperature should not exceed 85 degrees Fahrenheit
  • Warm: Water temperature should not exceed 105 degrees Fahrenheit
  • Hot: Water temperature should not exceed 120 degrees Fahrenheit

Ironing

  • Low: Temperature should not exceed 230 degrees Fahrenheit
  • Medium: Temperature should not exceed 300 degrees Fahrenheit
  • High: Temperature should not exceed 390 degrees Fahrenheit

When it comes to clothing maintenance, the fine print matters. If you’re pressed for time or unsure of specific treatment requirements, consider the array of services offered at a dry cleaner—from Dry Clean, Launder & Press to Hand Wash—to ensure your top pieces are well taken care of.

Image showing dry cleaning process

What is dry cleaning? Step by step Guide

Dry cleaning is any cleaning process for clothing and textiles using a chemical solvent other than water. The modern dry cleaning process was developed and patented by Thomas L. Jennings.[1]

Despite its name, dry cleaning is not a “dry” process; clothes are soaked in a liquid solvent. Tetrachloroethylene (perchloroethylene), which the industry calls “perc”, is the most widely used solvent. Alternative solvents are trichloroethane and petroleum spirits.[2] Tetrachloroethylene (perchloroethylene or “perc”) has been banned in California, with all use to be ended by 2023.[3]

Most natural fibers can be washed in water but some synthetics (e.g. viscose, lyocell, modal, and cupro) react poorly with water and must be dry-cleaned

Dry cleaning has two distinct advantages over cleaning with water or “wet” cleaning: Water swells the fibers. It is this swelling action that causes shrinkage and dye fading in many garments. Dry cleaning solvents are much more superior to water in the removal of oily or greasy residues which are the base component of many stains.

After your clothes have been properly cleaned, your cleaner “finishes” (presses) your garments using specialized finishing equipment.

Finishing processes used vary, depending on the garments being processed, but generally involve steaming and pressing.

DRY CLEANING PROCESS

Steaming is effective for relaxing wrinkles, enhancing pressing, and also serves to enhance cleaning by removing any remaining water-soluble materials and killing bacteria.

Pressing is the final step and produces crisp, smooth results difficult to duplicate at home with a hand iron. This requires considerable skill and training and allows for a final inspection of the garment. After your garments have been pressed, they are inspected one last time and packaged to await your arrival.

Factors Determining the Cleaning

Four major factors determine whether a garment is cleaned in water or solvent:

  • The types of soil present
  • The fiber composition and garment construction
  • The dye present in the fabric
  • The nature of the various trims, linings, or other findings that may be used in the garment.
  • Many factors determine whether a dry cleaning or a wet cleaning process is compatible with a particular garment or textile article. Your professional cleaner, therefore, must use his or her professional judgment to determine which process will best restore the garment to a like “new” condition.

STEP BY STEP GUIDE OF DRY CLEANING PROCESS

STEP 1: Inspection and Tagging Process:

This is one of the parts that you’re likely most familiar with. You take your garment into the cleaner’s, and the dry cleaner creates a tag for your item. This is also when your clothes are examined for any stains, missing buttons, tears, etc.

STEP 2: Pre-spotting and stain removal:

Here is where things begin to get a little hazier for the average dry cleaning customer. Once we’ve dropped off our garments, cleaners will typically go through a pre-spotting process where they’ll apply a chemical solvent, vacuum, or heat to stains on your garment, which helps to remove the stain during the actual dry cleaning process.

Step 3: Sorting
Garments are sorted for cleaning by category and color with consideration being given to the manufacturers recommended care label instructions.

STEP 4: The Dry Cleaning Process:

This is the part we never see. Once your clothes have been pre-spotted, your clothes are placed into a machine and submerged into a non-water based solvent. The clothes are then rotated in a perforated cylinder where the cleaning solvent is released in a steady amount throughout the entire process. From there, the machine rapidly spins the clothes to get rid of any excess solvent and releases warm air. Your clothes emerge completely dry.

STEP 5 : Post-spotting:

Here your cleaner will inspect your clothes for any remaining stains and residue and remove them using the same process they did in the pre-spotting stage.

STEP 6: Pressing and Finishing:

Once your clothes have gone through the completely dry cleaning process, they are pressed, steamed, or ironed for presentation. This is the part we love because it makes our clothes look and feel amazing.

Step 7: Final inspection and packaging
Garments are given a final inspection and prepared for collection.

Dry Cleaning can be beneficial for garments made from fibers that don’t react well when exposed to water, like silk and wool. It’s also good for garments that shouldn’t be exposed to the heat of a traditional dryer.

While the dry cleaning process is inherently opaque to the average customer since everything happens “behind the scenes,” all in all, it’s pretty straight forward once you understand the steps. If you’re interested in having an item dry cleaned, schedule a Rinse, and try our Dry Cleaning/Launder & Press service.

Let someone else take care of the laundry

If you’re overwhelmed by piles of grubby laundry, then why not let someone else deal with it? Our award-winning dry cleaning and laundry service makes wash day a breeze. Upon subscription, We’ll collect your laundry, clean and iron it using professional methods and equipment, and return it to your door. We’ll even fold or hang it for you, so it’s ready to go straight in the wardrobe or drawer.

Your washing machine needs to be cleaned thoroughly every couple of months, and you should be running a hot maintenance cycle at least once every two weeks. This will leave your machine out of action for a few hours, so subscribe to our service and let us handle the hard work while you scrub up.

feat-how-to-remove-mildew-from-clothing

How to Remove Mildew on Clothes: Step by Step

What is mildew you might ask? Mildew is a form of fungus. It is distinguished from its closely related counterpart, mold, largely by its color: molds appear in shades of black, blue, red, and green, whereas mildew is white.


I’m sure you’ve never forgotten a wet bib that fell between the car seats, only to find it a week later…and covered in mildew. And I’m positive that you have never left wet towels in your kitchen hamper for days on end only to come back and find them moldy. Right?

These kinds of things happen only at the Hill House, I’m sure.

Mold and mildew can be extremely hard to remove. If you use these tips, you have a fighting chance at removing it from your stained garment. But honestly? There aren’t any products that I am aware of that are made specifically for mold and mildew on fabrics.

So if you’ve incidentally left a garment a little too long in a wet, dark, damp place, here is how you can try to remove the mildew stain. Keep in mind I am not advocating this for garments or towels that smell like mildew – but those items on which you can visibly see mold or mildew.

  1. USE A TOOTHBRUSH TO SCRAPE OFF MOLD

If the item has visible mold on it, you’ll need to scrape off as much of the mold as you can with an old toothbrush.

If the item is a piece of clothing, gently use a toothbrush to scrape it off. You don’t want to disrupt the fibers of the garment permanently. You need to remove as much of the mold as possible so the washing machine can clean deep into the fibers during the wash cycle.

This is just doing an intense pre-wash, in the hopes of removing the stain completely.

  2. WASH THE ITEM BY ITSELF ON A WARM, NORMAL SETTING USING OXI CLEAN

Mildew and mold spores can spread all kinds of yuck for us to breathe in. As soon as you notice the mold or mildew, wash the item by itself in the washer.

If you have a front loader, put some old towels or rags that you use for cleaning in the washer also. You want to trick the front loader into using a lot of water, to remove the mold and mildew.

Make sure you use a ‘warm’ water setting and wash on ‘normal’ (not delicate).

It seems like one would want to use a ‘hot’ water temperature, but trust me: you don’t. Heat tends to set stains and you don’t want to set in a mildew stain.

3. LET THE ITEM AIR DRY

Allow the item to air dry completely. Do not dry it in the dryer. Can you still see the mildew or mold at all? If not, success! If you can still see it, go on to the next step.

4. TRY THE SOAK

While I’m not aware of any products formulated for the removal of mildew on fabric, Oxi Clean does a pretty good job. But you’ll need to soak your item for a fairly extended period.

I inadvertently left a dishcloth in the back corner under my sink and I had to soak it four days before the mildew came out of the fabric. It slightly lifted the color from the fabric since I soaked it so long, but the mildew stain was finally removed.

After you do The Soak, wash as you normally would, and hang to dry. Don’t dry it until you’re sure the stain is removed to your satisfaction.

5. TRY BATHROOM MILDEW REMOVER

This sounds a little unconventional, however, spray a bathroom mildew remover on the stained areas if The Soak doesn’t work.

Now here are some huge caution flags:

— This is going to bleach your garment. Without a doubt, it will cause at the very least some lifting of the color if not all of the color.

— It potentially could eat a hole in your garment also since mildew removers are largely made up of bleach.

The choice to use this type of product is a last act of desperation. Hopefully, your garment is white and it won’t matter.

You can put a small amount on a Q-tip and test the inside seam to see if it will cause the item to fade. If it doesn’t in just a few minutes, you can either spray the mildew remover straight on to the item or dab it on using a Q-tip on the cotton ball.

I have used mildew remover with great success in the past. After you’ve left the product on about 5 minutes or so, wash on a regular cycle using a ‘warm’ water temperature.

Again, hang the item to dry until you are sure the stain is removed.

♥ I’ve used X-14 and Tilex Mold & Mildew Remover with great success!

6. DRY THE ITEM IN DIRECT SUNLIGHT

The Sun is a fabulous, free source of bleach! Once you’ve completed The Soak or used the bathroom mildew remover, wash in the washing machine.

If you have access to drying a garment outside, let it get full sun for a couple of hours. Hopefully, it will be the last step you need to take to remove the stain completely.

Some stains just can’t be removed, despite how much effort you put into them. Mildew and mold top the list of hard-to-remove stains! If you have specific questions, feel free to leave them in the comments.

Let someone else take care of the laundry

If you’re overwhelmed by piles of grubby laundry, then why not let someone else deal with it? Our award-winning dry cleaning and laundry service makes wash day a breeze. Upon subscription, We’ll collect your laundry, clean and iron it using professional methods and equipment, and return it to your door. We’ll even fold or hang it for you, so it’s ready to go straight in the wardrobe or drawer.

Your washing machine needs to be cleaned thoroughly every couple of months, and you should be running a hot maintenance cycle at least once every two weeks. This will leave your machine out of action for a few hours, so subscribe to our service and let us handle the hard work while you scrub up.

Laundrymann |How to clean your washing machine

How to clean your washing machine

How to clean your washing machine

If your washing machine is smelling worse than your sweaty workout shirt, it’s time to give it a good cleaning. Yes, even washing machines get dirty.

Laundry soils, detergent and hard-water minerals build up in areas you can’t see and mold and mildew can thrive in the washer lid and the door, according to green-cleaning coach Leslie Reichert.

When your appliance is dirty, washing your laundry can end up doing more harm than good. Dirt, detergent, mould, and hard-water deposits build up inside your machine, and over time these can develop a musty odour, giving your clothes that damp, mouldy smell. If left untreated for a long time, they can even affect the efficiency of your machine. So, it’s essential to keep dirt and muck in check by giving your washing machine a little TLC from time to time.

As well as giving better results on your laundry, cleaning your washing machine regularly could help to extend the lifespan of your appliance, so it’s well worth the elbow grease. To help you keep your washing machine (and your laundry) looking great and smelling fresh, we’ve put together this guide that covers:

How to clean a front-loading washing machine:
What you’ll need:

  1. White cleaning vinegar
  2. Spray bottle
  3. Microfiber cloth
  4. Baking soda

Cleaning a washing machine with vinegar and baking soda

Vinegar and baking soda offer one of the most effective ways to clean your washing machine. Simply add 1–2 teaspoons of water to 3 tablespoons of bicarbonate of soda to form a thick paste, and add this to the detergent drawer. Next, tip 250ml of white vinegar into the drum, then run your washing machine on a 60°C cycle. The two ingredients will work together to break down any grime and residue, as well as neutralising any musty odours in your machine.

White vinegar may be an amazingly versatile cleaning product, but it does have a sharp, distinctive scent. So, unless you want your laundry to smell like a chip shop, you’ll need to run another long, hot cycle to completely get rid of any remaining vinegar before you put any laundry into your machine.

Cleaning a washing machine with soda crystals

Soda crystals have long been a favourite cleaning additive for their ability to dissolve grease, shift stains, and wash away unpleasant smells. To use soda crystals to clean your washing machine, simply add 500g of pure soda crystals to the drum, and then run your machine on the longest, hottest cycle. This will rinse away any stains and smells, leaving you with a clean, fresh machine.

If you live in an area with very hard water, then it may help to add 250ml of white vinegar to the drum before washing, as the two ingredients will work together to break down any limescale build-up.

Cleaning a washing machine with bleach

If you think your machine needs a deep, intensive clean, then bleach could be the solution for you. Bleach will kill off any lingering bacteria, so it’s great if you want to ensure that your washing machine is completely sanitised and free of any harmful germs.

To clean your washing machine with bleach, simply add 60ml of neat bleach to your detergent drawer then run your machine on a hot cycle, with an extra rinse cycle to make sure all the bleach is flushed out. If you can smell any trace of the bleach afterwards, run another empty cycle to be on the safe side.

Remember, bleach is highly reactive, so you should never use it with any other cleaning products, as it could cause an adverse reaction that could damage your machine. Bleach and hot water can also produce a lot of foam, so don’t use more than the dose we’ve recommended.

How to clean the different parts of a washing machine

While the methods we’ve listed above will clean your washing machine’s internal workings and neutralise any nasty odours, you’ll need to pay special attention to the detergent drawer, filter, drum, and seal. All of these can be particularly susceptible to grime, soap scum, and mould, so they will all need a bit of extra TLC to get them sparkling clean. In this section, we’ll cover how you can clean each part of your washing machine.

Cleaning the drawer

Laundry powders, fabric softeners, and specialist detergents can leave a crusty residue inside the detergent drawer, and all of those little nooks and crannies can be vulnerable to black mould, too. The simplest and most effective way to clean it is to remove the entire drawer (check the manufacturer’s instructions if you’re not sure how to do this) and wash it by hand.

Soak the drawer in a bowl of hop soapy water, and then wipe it clean with a damp cloth. If any dried-on detergent residue or mould is tricky to remove, then spray on some multipurpose household cleaner and give it a scrub with an old toothbrush. Then, give your drawer a final rinse, dry it off, and place it back into the machine.

Cleaning the filter

Most washing machines will have a filter, usually hidden behind a panel on the front of the appliance. The filter is designed to catch lint, hair, and even small items that might have made it into the wash by accident, like loose change or hairpins. If the filter becomes clogged up, it can stop the machine from cleaning effectively, so you should check and empty the filter at least once every three months.

Exactly how you should access and remove the filter will very between different manufacturers, so check the care and maintenance guide carefully before you do this. Once you have removed the filter, empty any lint or other small items and give the whole thing a wipe down with a damp cloth before putting it back into place.

Cleaning the drum

Cleaning the drum is fairly straightforward: simply wipe away any visible marks with a cloth. If there’s an unpleasant aroma inside the drum but you can’t see any mould or dirt, then this is likely caused by nasty bacterial growths that are invisible to the naked eye. You certainly don’t want this to transfer onto your clothes, so it’s important to sanitise the drum at least once a month: use one of our suggested cleaning methods to remove any blockages, and then run your machine on the hottest cycle (preferably 90°C) to kill off any germs.

Cleaning the seal

The rubber seal between the drum and the door — sometimes called the ‘gasket’ — can be one of the trickiest parts of the machine to clean. This area can be especially vulnerable to build-ups of lint and soap scum, but by far the biggest problem tends to be black mould. These seals are usually deeply ridged, with lots of moisture-trapping nooks and crannies, providing the perfect breeding ground for mildew and mould.

To clean the seal, take a damp cloth or sponge and some household cleaning spray, and use them to wipe all around the rim, being careful to get inside any grooves or folds. If your seal is really mouldy, then spritz on some specialist mildew spray and leave it to work for five minutes before wiping away with a clean damp cloth. After cleaning, you’ll need to run a short cycle to make sure all of the cleaning fluid is completely removed, as many cleansers contain bleaching agents which could stain your laundry if left in the drum.

Keeping your washing machine clean

Once you’ve cleaned your washing machine, there are a few simple things you can do to stop it from getting grimy again, and keep it working as efficiently as possible.

  • Don’t use too many products

While all of those specialist detergents and fabric softeners might be great for your clothes, it’s thought that these extra products can contribute to build-up inside your machine. So, try to use specialist products only when you really need some extra cleaning power to deal with tough stains or heavy soiling.

  • Run a hot cycle once a week

Most of our laundry, including everything from our clothing to our bedsheets, is washed at 30–40°C. But, while washing at 30°C might be better for the environment, it won’t get rid of any nasty bacteria that could be lurking inside your machine. A long hot cycle once a week — at least ‎60°C, and preferably 90°C — should kill off any bacteria and sanitise your machine.

  • Dry and air your machine between washes

In between washes, you should leave the door of your machine open slightly to allow moisture to escape. This will help to air the drum out, and prevent mould from forming inside the appliance and on the seal. It will also help to wipe the seal dry after washing, as this will stop mould from forming in the folds of the rim.

  • De-scale your machine regularly

Our water supply contains small amounts of calcium and magnesium, and these minerals combine to form limescale. Large build-ups of limescale inside your washing machine can make your appliance less effective, and can even make your machine less energy-efficient and more expensive to run. Left untreated, they could even cause your machine to break down. That’s why it’s so important to de-scale your machine with a quality descaler at least once every 3–6 months. Limescale will build up faster if you live in an area that’s served by a hard water supply, so you may need to de-scale your machine more frequently.

  • Don’t leave laundry to sit in the drum

Leaving your clean washing to sit in the drum for hours after the wash cycle has finished will make both your laundry and your machine smell musty and damp. So, always remove your wet laundry as soon as possible as washing. If you’ll be out of the house, use the delay function, so that the end of the wash cycle coincidences with when you’ll return home.

Let someone else take care of the laundry

If you’re overwhelmed by piles of grubby laundry, then why not let someone else deal with it? Our award-winning dry cleaning and laundry service makes wash day a breeze. Upon subscription We’ll collect your laundry, clean and iron it using professional methods and equipment, and return it to your door . We’ll even fold or hang it for you, so it’s ready to go straight in the wardrobe or drawer.

Your washing machine needs to be cleaned thoroughly every couple of months, and you should be running a hot maintenance cycle at least once every two weeks. This will leave your machine out of action for a few hours, so subscribe to our service and let us handle the hard work while you scrub up.